Ballerina nails – the sleek, tapered shape reminiscent of a dancer’s slippers – have taken the nail world by storm. As a nail artist with over 8 years in the industry, I’ve seen this elegant shape evolve from simple French tips to jaw-dropping works of art. What makes Ballerina nails so special? Their elongated silhouette flatters every hand shape, making fingers appear more slender and graceful. Whether you’re prepping for a wedding or just want everyday elegance, these 15 show-stopping designs will transform your manicure game. Let’s dive into the most gorgeous Ballerina nail trends for 2025!
- See Also: The Best French Tip Nails for 2025
- See Also: The Best Spring Nails for 2025: The Top Experts Picks
15 Stunning Ballerina Nails To Explained
1. Cherry Delight Ballerina Nails

This timeless crimson look features deep cherry-red tips with a high-gloss finish that screams luxury. Start with a milky pink base (try Essie’s “Ballet Slippers”), then use an angled nail art brush to paint the classic French tip in a rich cherry red like OPI “Big Apple Red”. For dimension, mix a clear top coat with red glitter and apply just to the tips using a fan brush – this creates a subtle ombré effect. The key is keeping the glitter sparse at the base of the tip and gradually increasing density toward the edge. Perfect for holiday parties, this design pairs beautifully with gold jewelry when you want to make a statement. For a modern twist, try a matte top coat on the base with glossy tips – the contrast elevates the look. Maintenance tip: Red tips show chips easily, so carry your polish for quick touch-ups.
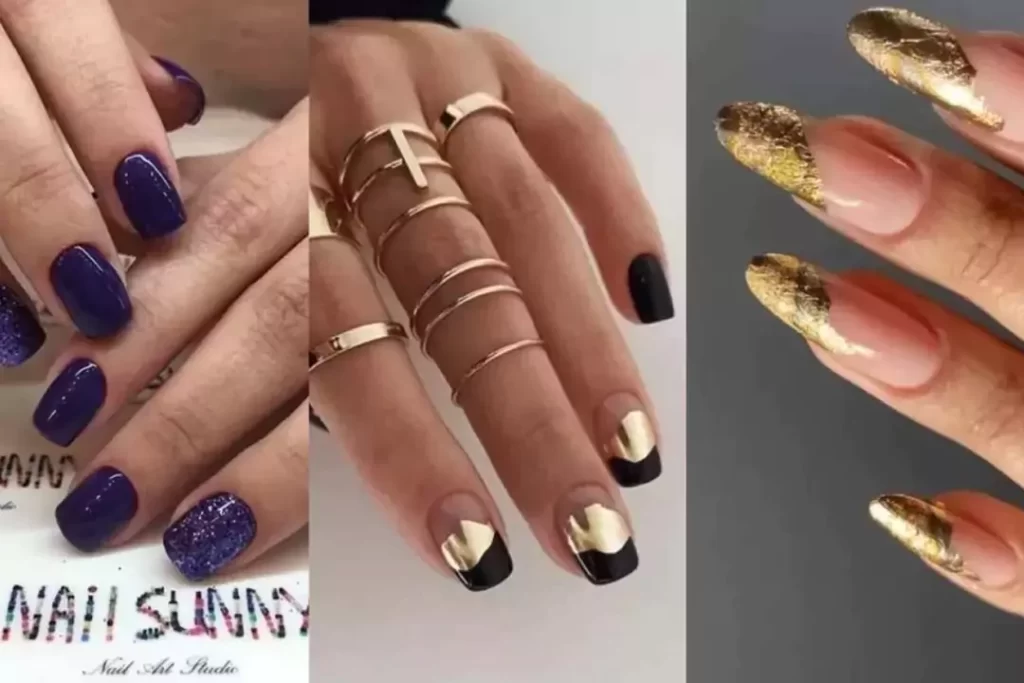
2. Sandy Muse Ballerina Nails

Channel desert glam with this neutral beige design featuring delicate gold flecks. Begin with two thin coats of a warm beige (try Zoya “Avery”), making sure each layer dries completely. For the gold accents, use actual gold leaf flakes rather than glitter – they lay flatter and look more luxurious. Apply them randomly using tweezers, concentrating near the tips but letting some float toward the center. The magic happens when you finish with a sheer pink top coat (like Butter London’s “Hardwear Shine”) to blend everything seamlessly. This creates the illusion of gold naturally embedded in the nails. Celebrity manicurist Gina Edwards recommends this for clients who want “expensive-looking hands without being flashy.” Pro tip: Use a clean eyeliner brush dipped in acetone to precisely remove stray gold flakes before top coating.
3. Ombré Elegance

A softer take on French tips, this design blends from nude to pink at the tips. The secret is in the prep: start by buffing nails to remove any ridges, as ombré highlights imperfections. Apply a sheer pink base (Dior “Nail Glow” works perfectly), then take a wedge makeup sponge and dab white polish at the very edge. The technique: pat – don’t swipe – move upward about 3/4 of the nail. Immediately follow with a clean sponge dipped in your base color to soften the transition. Work in thin layers, letting each dry for 2 minutes before adding the next. This design grows out beautifully – the gradual fade means regrowth is less noticeable. For brides, swap the pink for ivory (try Essie “Marshmallow”) and add a single Swarovski crystal at the base of one nail for a subtle sparkle.
4. Mirror Chrome Ballerina Nails

These high-shine metallic tips will stop traffic. After your base color (a pale pink works best), apply a no-wipe top coat and cure under LED light for 60 seconds if using gel. Immediately rub chrome powder (like Born Pretty’s Mirror Chrome Powder) using a silicone applicator in quick, firm strokes – hesitation causes streaks. Buff until you achieve that liquid metal effect, then seal with another top coat. The key is perfect nail prep – any ridges will show, so invest in a good buffer (I recommend the OPI 240/240 grit). For extra drama, try a two-tone effect by applying chrome only to the outer 1/3 of the tip. Style tip: Pair with minimalist jewelry to let your nails shine (literally!). Warning: This look is addictive – clients report getting compliments for weeks with this manicure.
5. Denim Dreams Ballerina Nails

Who knew jeans could inspire such chic nails? This design requires specific tools: a denim-blue cream polish (OPI “Can’t Find My Czechbook” is perfect), a striping brush, and a matte top coat. Paint two coats of blue, then use white polish to create tiny “X” stitches along the tips – make them slightly uneven for authenticity. The magic touch? Before the white dries, gently drag a toothpick through the center of each X to create a thread-like texture. Finish with a matte top coat but leave the very edge glossy to mimic denim’s raw hem. This playful look pairs perfectly with casual outfits but has enough sophistication for office wear. Pro tip: Use a slightly darker blue to outline the stitching for added dimension.
6. Floral Romance Ballerina Nails

Classic red meets delicate blooms in this feminine design. Start with a classic red French tip (China Glaze “Ruby Pumps” has the perfect blue undertone), then use a 5/0 detail brush to paint tiny flowers. Mix white and a touch of gold polish to create the petals – work in odd numbers (3 or 5 petals per flower) for a natural look. Add micro gold dots in the centers using a toothpick. The contrast between bold tips and dainty florals creates visual interest that elongates the nail bed. For beginners, floral stickers (like the ones from MoYou London) work beautifully – just seal with a thick top coat to prevent edges from lifting. This design transitions seamlessly from day to night, especially when paired with a floral dress. Maintenance tip: Carry a small bottle of top coat to refresh the shine as red tends to dull faster than other colors.
7. Glossy Pink Ballerina Nails

These juicy, lipstick-inspired nails are the ultimate in feminine glam. The key is finding your perfect pink – it should be 2-3 shades brighter than your natural nail bed but still in the same color family. For fair skin, try Essie’s “Fiji”; medium skin tones shine with OPI “Bubble Bath”; deeper complexions pop with Orly’s “Kiss Me I’m Kind”. Apply three thin coats, waiting 3 minutes between layers – rushing causes bubbles. The final coat should be slightly thicker, applied when the previous layer is tacky but not dry. Immediately after applying, dip your nails in ice water for 60 seconds to set the shine. This technique, favored by Margot Robbie’s manicurist, creates that plush, lacquered look that lasts. For extra longevity, wrap the tips with each coat.
8. Disco Tips

Bring the party to your fingertips with glitter-dipped edges. The secret is using two types of glitter: first, apply fine glitter (like Glitterific’s “Rose Quartz”) to the entire tip, then add chunky glitter just at the very edge. Here’s how: paint the clear polish on the outer 1/3 of the nail, and immediately dip it into fine glitter at a 45-degree angle. While still wet, use tweezers to place 2-3 pieces of chunky glitter at the tip’s edge. Seal with a thick top coat, smoothing over any rough edges. This design catches light beautifully from every angle – the fine glitter provides base sparkle while the chunky pieces create dramatic highlights. Surprisingly wearable, the contained glitter makes it office-appropriate (depending on your workplace). Pro tip: Use a clean eyeshadow brush to remove excess glitter from the skin before it dries.
9. Holo Blooms

Iridescent florals on a sheer base create a magical dimension. Begin with 1-2 coats of holo polish (ILNP’s “Holo Taco” has the best color shift), then use a detail brush to paint delicate flowers with white gel polish. Cure under LED light, then apply a sheer pink jelly polish (like Cirque Colors “Lumiere”) over the entire nail – this creates depth like flowers floating under glass. The holographic particles create color-shifting effects that change from purple to green depending on the light. For maximum impact, add a single accent nail with larger floral designs using holo powder brushed onto a sticky base. This works particularly well on longer Ballerina shapes (2+ inches of free edge), giving the designs room to shine. Maintenance tip: Avoid acetone soaks which can dull the holo effect – opt for gel removal wraps instead.
10. Pastel Perfection Ballerina Nails

Soft candy-colored tips bring spring vibes year-round. Choose 2-3 complementary pastels (lavender, mint, and peach work beautifully) from the same brand to ensure a consistent formula. The application trick: paint all nails with the lightest color first (usually the mint), then alternate colors while keeping the same opacity level. Use a white base under sheer pastels to boost vibrancy. These sweet shades look especially fresh against tan or dark skin tones – the contrast makes both skin and nails glow. For a subtle twist, make every fourth nail slightly darker in the same color family (e.g., lavender with one periwinkle accent). Pro tip: Pastels can streak – apply in three thin coats instead of two thick ones, waiting for full drying time between layers.
11. Neon Pop

Bold color-blocked edges demand attention. The key to vibrant neons is proper base prep: first, apply a white base (like OPI “Alpine Snow”), then your neon shades (China Glaze “Pool Party” for blue, “Flip Flop Fantasy” for pink). Use painter’s tape to create crisp lines – apply when the base is completely dry, press edges firmly to prevent bleeding, and remove immediately after painting. For a gradient effect, blend colors where they meet using a small eyeshadow brush dipped in acetone. These electric hues last longest with gel polish – UV curing prevents fading. Style tip: Balance the brightness with neutral outfits and minimal jewelry. Warning: These colors stain – always use a base coat and consider peel-off formulas for easy removal.
12. Electric Marble

Swirled neon designs create an artsy, modern look. Start with white tips, then use a thin brush (size 10/0) to drop neon colors in small dots while the polish is still wet. Immediately drag through the colors with a toothpick in S-shaped motions – work quickly before the polish dries. For a cleaner alternative, the plastic wrap technique: paint stripes of color on plastic, crumple onto the nail, then peel it away. This creates organic, watercolor-like patterns. The most striking combinations: are pink/yellow/orange or blue/purple/green. Seal with a glossy top coat to enhance the marble effect. This edgy design pairs perfectly with minimalist outfits, letting your nails be the focal point. Pro tip: Keep acetone and cleanup brush handy to perfect edges before top coating.
13. Moody Rainbow Ballerina Nails

Jewel-toned ombré tips in deep emerald, sapphire, and amethyst create sophisticated drama. The technique: paint each nail with a different jewel tone at the tip (try OPI “Amazon…Amazoff”, “No Room for the Blues”, and “Suzi Needs a Loch-Smith”). Use a small eyeshadow brush to blend where colors meet on 2-3 accent nails. For extra dimension, add a single gold foil accent nail with scattered leaf fragments. The rich tones make this perfect for fall – pair with cozy knits and gold jewelry. Pro tip: This deep colors stain – apply a sticky base coat first and remove polish after 5 days max to prevent discoloration.
14. Forest Tips

Earthy green meets gold accents for organic elegance. Paint nails with a nude base (Essie “Topless & Barefoot”), then apply a deep hunter green (OPI “Suzi & the 7 Düsseldorfs”) just at the tips. While wet, use tweezers to place irregular gold leaf fragments near the cuticle – uneven placement looks most natural. Finish with a matte top coat but leave the very tips glossy for dimension. This design bridges boho and edgy – equally stunning with flowy dresses or leather jackets. For autumn, add tiny burnt orange dots between the gold flakes. Maintenance tip: Reapply the top coat every 3 days to prevent green from staining the nude base.
15. Amethyst Glam

Sparkly purple glitter tips bring the drama. Use a gradient technique: apply clear polish to the outer half of the nail, then press into fine purple glitter (try Glitterific “Royalty”). Immediately add chunky glitter just at the edge. The multidimensional glitter catches the light differently at each angle – holographic particles create flashes of blue and pink. For maximum impact, pair with a matching amethyst ring. This design transitions beautifully from the day (subtle in indirect light) to tonight (dazzling under artificial lighting). Pro tip: Use a peel-off base coat for easier removal since glitter is stubborn. Apply cuticle oil daily to keep surrounding skin healthy as glitter can be drying.
Pro Tips for Perfect Ballerina Nails
Must-Have Products
- Essie “Ballet Slippers” – the iconic sheer pink
- OPI Chrome Effects Kit – professional mirror shine
- Cirque Colors holographic polishes – best color shift
- MoYou London nail art brushes – precision detailing
- Glitterific loose glitters – the most vibrant selection
Common Mistakes & Fixes
- Uneven tips: Use guide stickers (like French Tip Guides by Kiss) for perfect lines every time
- Glitter fallout: Apply over wet top coat, then seal with another layer
- Smudged designs: Work on one hand at a time, allowing full drying
- Short nail struggle: Use nude polish to elongate visually
- Bubbles: Avoid shaking polish – roll the bottle between palms instead
- Peeling: Always dehydrate the nail plate with alcohol before applying a base coat
Final Thoughts
From subtle nudes to bold neons, Ballerina Nails offers endless possibilities for self-expression. As we’ve seen, the shape itself is just the beginning – it’s the creative designs that truly make this style shine. Whether you’re drawn to the timeless elegance of Cherry Delight or the modern edge of Electric Marble, there’s a perfect look waiting for you.
Remember – the best design is one that makes you feel confident and beautiful. These manicures typically last 2-3 weeks with proper care, making them ideal for busy lifestyles. Always start with healthy nails, don’t skip the base coat, and moisturize cuticles daily to maintain your masterpiece.
Which of these looks will you try first? Tag us in your nail photos – we can’t wait to see your creations! For more inspiration, check out our Instagram @NailInspoDaily where we feature real client transformations weekly.
- You May Also Like: The Cutest Barbie Nails for Every Kind of Barbie